Showing posts with label 2007-2008 In colors. Show all posts

Monday, August 4, 2008

Elephant Train Card

COME AND GET THEM! The retiring Stamp Sets and Accessories are only around for SIX more days! You heard correctly...SIX!I have been spending a lot of time with my retiring sets. Making a bunch of things and lamenting the day [August 10th] that they will no longer be available. Sniff......

However, I lament only for a little while. "Why?" You ask. Well, I have had a sneak peek at some of the new items to come in the new catalog [available August 11th], and, OH MY GOODNESS, I am soooooo wicked excited! Yes, WICKED excited!!! [You can take the girl out of Maine, but you can't take Maine out of the girl! :-) ]
  • New Designer Series Papers, including Maine Blueberry DSP
  • The Big Shot Die Cut Machine - Stampin' Up! is partnering with Sizzix to offer this multipurpose machine, along with more than 35 dies--7 of which are only available through Stampin' Up!
  • New Simply Scrappin' Kits
  • New In Colors -- Pink Pirouette, Riding Hood Red, Tangerine Tango, Kiwi Kiss, Baja Breeze, Pacific Point
  • Scalloped Edge Punch
  • All NEW sets in the 2008 Fall & Winter Catalog are die-cut! What a time saver!
O.K. So back to the retiring sets. Here is a cute little idea I saw on Splitcoaststampers.com. I am sorry, but I lost the link to the person who came up with this idea. I changed up the colors and stamp sets. What do you think???Project Supplies:
Year After Year Stamp Set [retiring]
Weathered Background Stamp [retiring]
Amazing To Zany Stamp Set [retiring]
Purely Pomegranate CS [SOLD OUT]
Basic Black CS
Blue Bayou CS [retiring]
River Rock CS [retiring]
River Rock Ink [retiring]
Basic Black Ink
Basic Black Marker
Cropodile
Basic Eyelets [SOLD OUT]
Paper Snips
Basic Black 1/4" Grosgrain Ribbon
1-3/8" Square Punch

Friday, August 1, 2008

Guava, Ginger Blossom Birthday Card

I just love the look of this card. It looks fancy [because of the DSP], but is SO easy to do! I wanted to show you how easy it is to use the Amazing to Zany Stamp Set in your card making. I love this set for scrapbooking mainly, but it works well for cards, too! Check out the catalog and e-mail me to order it while you can, as it is retiring.

Did you notice across the bottom of the card? I stamped the words "delightful, splendid, terrific, amazing, fabulous" and filled in the dots with a Ruby Red Stampin' Write Marker. This set is VERY versatile!


Tips:

  • Crimp the 2"x4" piece of Ruby Red for texture
  • Score, fold up and adhere 1/2" to get the stripes at the bottom of the 4"x4" DSP.
  • I didn't bother to punch a whole in the tag, but adhered it to appear so.
  • Dirty up the "happy birthday" Groovy Guava square with your Ruby Red ink pad
  • Tie your ribbon and then add two extra pieces. I tie directly to the ribbon. Some others would tie separately and then use a Mini Glue Dot to adhere.
Project Supplies:

Amazing to Zany Stamp Set [retiring]
Groovy Guava CS [retiring]
Ginger Blossoms DSP [retiring]
Ruby Red CS
Ruby Red Classic Ink
Ruby Red Stampin' Write Marker
1-1/4" Square Punch
"Large" Tag Punch
Very Vanilla Taffeta Ribbon
Crimper
SNAIL


Here is a peek at the Amazing to Zany Stamp Set.


Thursday, July 31, 2008

Cutie Pie Punch Box Friend Card


HOLY MOLY, I'M STAMPING AND POSTING!

Sorry again to be gone for so long. Thanks for sticking with me :-) I will cut the chit-chat short and get right to it.


Lately, I am stamping with items that SU! is retiring. One big last hurrah, I guess. This card is flashy and cute. Great for a little "hello."


Products:
Three For You Punch Box [retiring]
Purely Pomegranate CS [retiring]
Whisper White CS
Wild Wasabi CS [retiring]
Purely Pomegranate Ink [retiring]
Wild Wasabi Ink [retiring]
So Saffron Marker
Bashful Blue Marker
Tag Punch
1-1/4" Square Punch
Bashful Blue 1/4" Grosgrain Ribbon
Wild Wasabi Double Stitched Ribbon [SOLD OUT]

Tuesday, July 29, 2008

Out of touch

Hello Stampers -- I am sorry to leave you all without a word. The summer has just taken over my every thought and all my time. I have been travelling extensively this month and have not really stamped anything new in a while. I am gearing up, though. The new SU! In Color colors came the other day and my new preview sets from the new catalog are on the way! I am so excited to share this all with you and will be stamping a ton when everything comes.

I do have two upcoming events that you will not want to miss:

****I am holding a "Retirement Party" where you will have the opportunity to see some of my favorite retiring products one last time before they're gone forever! You're not going to want to miss this! In addition to the opportunity to use some of these great retiring sets and products with your Make & Take project, I will highlight a new technique!

When: Monday, August 4th, 7 p.m.
Where: My House, 4R Deca Circle, Derry, NH
Cost: FREE!!!
R.S.V.P. by Friday, August 1st·
  • Come bid a fond farewell to my favorite retiring Stampin' products.
  • Learn a new technique!
  • Make your own project!
  • Potentially be the Mystery Hostess and earn at least $15 in FREE merchandise and a FREE Level One Hostess Set.
  • Great Specials!
Bring a friend [whom I have not yet met] and receive a special Stampin' gift for both of you! It would be great if you would bring a friend! This is the perfect event designed for the new or seasoned stamper. It will be a relaxed atmosphere with stamping, browsing the catalog, snacks and door prizes. Share this with someone you know well or invite someone you want to get to know better or both! :-)

So, sign today up for the "Retirement Party" and I will see you there! Whether you are a new stamper or an advanced stamper, you will have a great time at the Retirement Party! Come and play! I look forward to hearing from you :-)

****For those of you who can not make it and still want to participate: I will hold a Phone-A-Thon on Tuesday, August 5th! Place an order for the "Retirement Party", and I will give you all of the "Retirement Party" specials and discounts AND include the completed Make & Take project with your order!****

Thursday, June 26, 2008

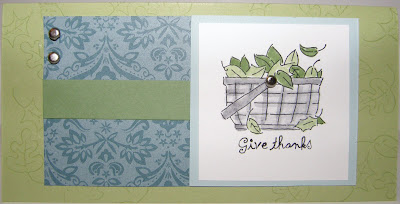
Give Thanks Card Kit

GIVE THANKS.....I just love this set! And [sniff...sniff] it is retiring! So sad. So, I am taking every chance I get to use it, and you should take advantage! "What have you been up to, Julie?" You might inquire.

Well, I have created a fabulous Card Kit with it! See details below and be sure to let me know if you have any questions!

Do you love having cardstock pre-cut for you? Then this is for you!

Check out the Card Kit Program to receive crisp, new ideas that are sure to inspire your creativity. This card kit’s items are listed below, and the price of the Card Kit is $15. This kit includes all of the consumable supplies you will need to create 12 cards. Shown above is just 1 example of a card you can make with your kit. Purchase the kit, and receive 3 additional full color samples for “alternative” cards you can make with the contents of your kit! In addition, you’ll receive detailed, step by step instructions on how to complete each of the 4 card designs.

Already have the inkpads and stamp set needed to make the cards in this kit? Just buy the Card Kit! Don’t have some (or any) of these items? See the “Add-on Products” list to pick out and order what you need to complete the cards. Just want the Card Kit to make your own designs? Go for it!

ORDERS FOR YOUR CARD KIT MUST BE PLACED NO LATER THAN JULY 15TH. You will receive your kits by the end of the month.

Special Offer: Purchase the Card Kit and receive the Coordinating Set at 20% off!

The Card Kit ($15) Includes:
§ 12 Pieces of 6” x 6” Certainly Celery Cardstock
§ 12 Pieces of 3” x 2 ½” Blue Bayou Prints Designer Series Paper (please note, the paper selections will vary from kit to kit)
§ 12 Pieces of 3” x ½” Wild Wasabi Cardstock
§ 12 Pieces of 2 ½” x 2 ½” Soft Sky Cardstock
§ 12 Pieces of 2 ¼” x 2 ¼” Whisper White Cardstock
§ 36 – Silver Brads
§ 12 Envelopes
§ Step by Step Instructions to complete 4 different card designs using the kit pieces

Add-on Products:
§ Certainly Celery Classic Ink Pad ($5.25)
§ Wild Wasabi Classic Ink Pad ($5.25)
§ Basic Gray Classic Ink Pad ($5.25)
§ Black StazOn Ink Pad ($7.50)
§ Give Thanks Stamp Set ($20.95) $16.76 with the purchase of the Card Kit

Other Optional Purchases:
§ 1/16” Hole Punch: to set the brads with
§ Blender Pens: for painting in the images with the Craft ink.
§ Stampin’ Dimensionals: for raising images for a 3-D effect

Please Note: I am glad to ship kits directly to you! If the kit needs to be shipped, there will be an extra $3 shipping charge.

Contact me today to order your Card Kit and see how quick and easy card making can be right in the comforts of your home.
Saturday, June 7, 2008

Fresh Cuts Die-Cut Notes 4x4 card

I LOVE THIS SET!
I LOVE THESE DIE-CUTS!
I CAN'T WAIT TO SEE THE NEW CATALOG IN AUGUST!


I made this card using the Brand NEW Fresh Cuts Stamp Set and the matching Die-cut 4x4 cards. Through the month of June, SU! is running a promotion giving you the chance to purchase the stamp set for $21.95 and get the coordinating Fresh-Cut Notes for $5! I couldn't pass it up!

Watch for a class I will be annoucing soon. Where you will be....well...details to come SOON!

FYI: The die-cut cards are on Whisper White CS. I colored this one Brilliant Blue by rubbing the ink pad directly onto the CS.

Instructions:
  • First, make your Build-A-Brad by sticking a 1/2" circle flower from the Build-A-Flowers[Wild Wasabi circle with White Flower] onto the brad base. Rub Crystal Effects [C.E.] onto the top and dip into Dazzling Diamonds Glitter. Add a tad more C.E. and adhere the "bubble". Allow to dry while you create the rest of the card.
  • Rub the Brilliant Blue Classic Ink.
  • Stamp randomly in Versamark with the "flowered vine" stamp. Dust with Crystal Clear Embossing Powder over your Powder Pal and heat with Heat Tool.
  • Tear 1/2" off the side with the Tearing Edge and remove the die-cut petals.
  • Add a white Build-A-Flower accent to the middle and punch [careful not to rip the CS] with the 1/8" Circle Punch. Add Build-A-Brad creation.
  • Stamp the biggest stamp in the set onto 3-15/16" x 3-15/16" Wild Wasabi CS and adhere to the card.
  • Tie Wild Wasabi Double Stitched Ribbon to card.
  • You are DONE!
Enjoy!

Thursday, May 29, 2008

Thanks Hanging Treat Box

Another school creation!


I did this with a group of mothers for Staff Appreciation Week at Erilynne's school. We made fifty of these projects. We hung the boxes off of water bottles and stuffed them with Crystal Light To Go and candy. Everyone just loved it!

I can't remember where I got the design. Sorry to whomever I owe the credit. Though, I did change it a bit color wise and made it into the Hanging Treat Box.

To find the Hanging Treat Box directions, click here.


Project Materials:
Give Thanks Stamp Set
Boho Backgrounds Stamp Set
Speckled Jumbo Wheel
Wild Wasabi CS & Ink
Purely Pomegranate CS & Ink
Basic Gray Ink & Marker
Staz On Black Ink
Blender Pens
Jumbo Wheel
Wild Wasabi Double-Stitched Ribbon
Mini Glue Dots
Sticky Strip
Scallop Punch
1-3/8" Circle Punch
1-1/4" Circle Punch
1" Circle Punch

Monday, May 5, 2008

A Light Unto My Path

Hi Stampers -- Well the demonstrator Boho West Event 2008 that I attended on Saturday was fabulous! I met a great bunch of fellow demonstrators and got all jazzed up with new ideas and techniques. Thank you to all who said a prayer for me with the little Power Tip that I did. The butterflies in my stomache stayed in control and I didn't do or say anything embarrassing... PHEW!

I ended up spending the entire night last Friday making roughly 50 swaps to trade with others, and I came home with some of the most fabulous color combos and layout ideas! Thank you to those who shared their talents!
Here is the swap that I made. I used one of my FAVORITE new sets...A Light Unto My Path. I have a thing for lighthouses. So serene and peaceful. It must come from growing up in Maine near the ocean and Portland Head Light. I just LOVE to visit there. The waves. The rocks. The history. But, I digress......
This card is beautiful, yet quick and easy! Enjoy!

A Light Unto My Path
A Light Unto My Path Stamp Set
River Rock CS & Ink
Brocade Blue CS & Ink
Whisper White CS
5/8" Brocade Blue Grosgrain Ribbon
Staples

Friday, May 2, 2008

May Flowers - Ginger Blossoms

Hi Everyone!


May is here and with it Spring! I just love watching all the plants come back to life and sprout flowers and buds. So exciting! Though, it has been a little on the cold side of things this week. Not to complain, this is better than all the snow!
Thank you so much for all your patience as I have been undergoing construction. My stamping room is still torn apart and now waiting for paint. Ugh! But.....it is going to be so fabulous to have it DONE! Woohoo!

I am headed off to my upline's Stampin' Event 2008 tomorrow. Please pray for me as I am doing a short presentation for over a hundred demonstrators. I am a little nervous....yikes, but on the whole, the day is going to be AWESOME!!! I am currently mass producing a card to swap there. I hope to come home with some fabulous new ideas and layouts that I can share with you later.

I know you must be chomping at the bit to see something new. So to go along with May Flowers, springtime and things that are new, I have created something to make you think outside of the "box" [card or whatever you usually stamp]. Tupper, my husband, has taken to saving all sorts of containers for me. Lately [well, before the construction], I would go downstairs to find some new container on my work table. "What I am supposed to do with this?" I would ask. "I thought you could make something out of it." He would answer. Aww....he is trying to help me create new stuff! He is so great!

O.K., enough mushiness, THIS project is made from an ice tea canister. The top comes off and I am using it as a door prize bin. I was always forgetting a basket and I think this is soooo much better! You can just let your imagination run wild with all the uses: piggy bank, candy container, gift container....your turn!


Tips:
*Measure the height of your canister and cut the DSP to match.
*Wrap the DSP and mark where it touches to get the circumference.
*Create your embellishment and adhere with Sticky Strip. SNAIL adhesive just is not strong enough for this project.
*Decorate the top of the canister.
*To create the hole in the top, us the Word Window Punch as a template on a scrap piece of paper. Decide the width of your hole [mine is one and a quarter WW Punches. Very exact, as you can see ;-p ]. Place the template over the center and cut with your hobby blade. [Mine did not cut so well, so I added the accent paper to cover the boo-boo. See pictures below.]


Ginger Blossoms Container

Ginger Blossoms DSP
Embrace Life Stamp Set
Groovy Guava CS & Ink
Ruby Red CS & Ink
Old Olive Ink
Gold Brads
1/16" Circle Punch
Word Window Punch
Groovy Guava Double Stitched Ribbon
Sponge
Sticky Strip
Hobby Blade and Cutting Mat


Related Posts with Thumbnails