Thursday, November 20, 2008

Thanksgiving Thanks

The holidays are upon us, and it is the time of year that my family likes to celebrate. We are travelling this year to visit my husband's extended family, so we are unable to be with my family for the Thanksgiving holiday. So, I made this card for my mom to let her know that I am thinking of her and miss being with her. I hope she likes it.

I then changed it up a little bit and turned it into a "Thank You" card. I want to give this to my husband's aunt and uncle for hosting us over the holiday.

Project #1 Supplies:
With Gratitude Stamp Set
Holidays & Wishes Stamp Set
Chocolate Chip CS & Ink
Ruby Red CS & Ink
Very Vanilla CS
VersaMark
Earth Elements Buttons
Mini Glue Dots
Cutter Kit - Distressing Tool
Heat Tool
Stampin' Emboss Powder - Clear
Powder Pals

Project #2 Supplies:
With Gratitude Stamp Set
Chocolate Chip CS & Ink
Ruby Red CS & Ink
Very Vanilla CS
Sponges
Paper Snips
Mini Glue Dots
Hemp Twine

Tuesday, November 18, 2008

Handmade Gifting - Journal & Bookmark


Handmade gifts are the best! What better way to tell someone you care then to make them a journal and write a letter in the first page? That way they always know how you feel. I have two best girl friends. You know the kind that go through everything with you and still like you! The kind that you can call in the middle of the night and cry with. I have two! I am very blessed to know them both. Love you E & J!
One recently had a birthday and I made these items for her. She LOVED them! Pink....is all her color. Not to give it all away or anything, but I bought a "science" journal [you know the one they had you buy for Chemistry in high school?] at the dollar store and then covered it with Designer Series Paper. I adhered Stampin' Up!s fabulous 1-1/4" Striped Rose Red Grosgrain Ribbon to the binding, added some die-cut adhesives from the retired Simply Scrappin' Kit - Rose Cottage, and then stamped a Monogram J [also, retired] and clear embossed it. Voila! Done!

I also made her this super fabulous bookmark! I take NO credit for the idea or design. [Stampin' Up! did this idea at Convention this year. VIEW HERE] But, the colors are all mine :-) Of course, Rose Red to go with the pink theme. I love this bookmark, because it flops over the outside of your book or SU! catalog and the Filigree Brad at the bottom pokes out the end. So pretty!

Here are the details on how to make your own bookmark. Feel free to comment!


Eastern Blooms Bookmark
STAMPIN’ SUPPLIES (items with * are new)
Stamp Sets
*Eastern Blooms (#111624, p.91, $21.95)
Card Stock and Paper
Pumpkin Pie: 4 ¾ x 4 ¾” (#105117, p.164, $5.50)
Whisper White: 2 ¼ x 1 ¾” (#100730, p.163, $7.50)
*Sweet Always DSP: (#112468, p.171, $9.95)
Ink
Regal Rose Classic Stampin’ Pad® (#105211, p.165, $5.25)
Rose Red Classic Stampin’ Pad® (#101778, p.165, $5.25)
Chocolate Chip Stampin‘ Write Marker® (#100071, p.164, $3.25)
Accessories and Tools
On Board Essentials (#112085, p.181, $12.95)
Stampin’ Dimensionals (#104430, p.191, $3.95)
Sticky Tape (#104294, p.191, $6.95)
Micro Beads (#104266, p.190, $5.25)
Filigree Brads (#112577, p.184, $5.95)
Powder Pals (#102197, p.190, $19.95)
Crystal Effects (#101055, p.191, $6.25)
Paper Snips (#103579, p.192, $9.95)
1” Rose Red Double-Stitched Grosgrain Ribbon (#111846, p.186, $8.95)


INSTRUCTIONS
*Pop out the square in the middle of the scalloped On Board Square and set it aside. Ink both sides of the chipboard with Regal Rose Ink. [This can be messy, so you might want to find a wipe first to clean your hands after.] Set aside to dry.
*Layer Sweet Always DSP onto Pumpkin Pie CS.
*Stamp the “flower” image onto Whisper White CS by first inking in Rose Red ink and then coloring the middle with the Chocolate Chip Marker. Cut out with Paper Snips.
*Adhere the layered DSP onto the front of the On Board Scalloped Square with SNAIL. Turn over and adhere four strips of Sticky Tape inside of the open square onto the back of the Pumpkin Pie CS. Adhere ribbon on Sticky Tape inside the square leaving a small space near the top. Apply more Sticky Tape on top of the ribbon and adhere the On Board Square inside, as best you can. Adhere Pumpkin Pie CS with A LOT OF SNAIL on top of the ON BOARD square and ribbon to cover back.
*Fold the bottom of the ribbon in half lengthwise and cut a “V.” Place Filigree Flower and Brad at the bottom.
*Adhere cut flower to the front of your bookmark with a Dimensional on each petal and in the middle. Apply a small amount of Crystal Effects to the middle of the flower only for now. [Be careful this comes out fast!]. Hold your bookmark over the Powder Pals and sprinkle with Micro Beads. [Be careful they bounce!] Apply Crystal Effects to the rest of the flower and over the Micro Beads for a “shellacked” look. Set aside to dry. [This could take a half hour or more depending on the amount of CE you applied.]

Sunday, November 16, 2008

Die-cut "JOY" Card...In Transition


"Why aren't we making that!?!" Is the comment I got when I showed this to the Stamp-A-Stack participants. Umm....."I couldn't simplify it for reproduction or explain it very well?" Sigh....you see I am visual learner and writing the directions for my classes is the toughest job for me. I try so hard to make things easy for everyone and having the directions is a must. BUT....it is a pain! I just could not explain this one [the second card, not the first], because, while very beautiful, the measurements for a regular 4-1/4" x 5-1/2" card just don't quite fit the Pennant Die. So, there is bit of finagling and THAT was the difficult part to explain. I can show you, but that did not fly for the Stamp-A-Stack. That and my brain stopped working after a while what with writing up directions for TEN cards! Oh and the S-A-S cards needed to be easy to replicate and fairly quick, since everyone was making ten DIFFERENT cards. So, I ended up with several versions until I ended up with a simplified EXPLAINABLE version that is a little bit like the first.
Here are the others. You can see my transition to the final version, which is the last "JOY" card with the peek-a-boo snowmen. The third card almost was the one we did, but my dear fabulous husband crinkled his nose at the colors. I told him that it was the one and I liked it, but the next morning my nose crinkled....Sigh....I went back to the drawing board. But, not empty handed. He did like the peek-a-boo snowmen and actually came up with the idea for them to be on the INSIDE of the card! Thanks, Tup!


FINAL VERSION PROJECT SUPPLIES
....[I can post the other ingredients if anyone is interested. Just leave a comment and I will write them up! Thanks! :-)]

JOY Snowman Card
Stamp Sets:
Snow Swirled (#111690, p.32, $24.95)
Holiday Lineup (#111648, p.36, $21.95)
Inks:
Classic Stampin’ Pad®, Kiwi Kiss (#111835, p.162, $5.25)
Classic Stampin’ Pad®, Riding Hood Red (#111836, p.162, $5.25)
Classic Stampin’ Pad®, Baja Breeze (#111833, p.162, $5.25)
Classic Stampin’ Pad®, Close To Cocoa (#103139, p.164, $5.25)
Paper:
Riding Hood Red Card Stock, 3” x 3”, (#111353, p.162, $5.50)
Kraft Card Stock, 4 ¼” x 5 ½”, (#102125, p.166, $7.50)
Very Vanilla Card Stock, 5½”x 11” (#101650, p.163, $7.50)
Very Vanilla Envelope, Medium (#107300, p.167, $6.50)
Accessories:
Wide Oval Punch (#112082, p.188, $15.95)
Sizzix Originals™ Die, Join in the Cheer Decorative Strip Die (#113452, p.29 Mini, $21.95)
Big Shot Die-Cut Machine (#113439, p.27 Mini, $99.95)
Grosgrain Ribbon, 1¼” Riding Hood Red/Very Vanilla (#113099, p.23 Mini, $8.95)

Comments: Fold the Very Vanilla CS in half. Tie a knot in the Red Riding Hood Grosgrain Ribbon and adhere to Kraft CS with SNAIL by tucking the ribbon over the edges and SNAILing to the back of Kraft CS. Adhere Kraft CS to card front. Line up and punch an oval with the Wide Oval Punch [All the way in and ½” from the right hand side. Use two hands…this may be tough]. Open your card and stamp snowflakes around oval: Large - Baja Breeze Ink, medium - Kiwi Kiss Ink, small - Riding Hood Red. Die cut “JOY” with the Big Shot and adhere with SNAIL. [See directions at Big Shot station.] Adhere “JOY” with SNAIL to bottom left of card. Lightly trace the oval “window” with a pencil. Open the card, line up the snowmen over the traced oval, and stamp with Close To Cocoa Ink.

Saturday, November 15, 2008

Another Stamp-A-Stack Creation, not used

The Stamp-A-Stack yesterday was a FABULOUS success! You really should come next year! We had fun and everyone worked very hard to finish all of their wonderful creations. Nicely done, ladies!


Here is another one of the creations that I did not use. I did emboss the tree to get a bolder look for it, but you do not need to if you want to simplify it for mass holiday production. Just use the Encore Gold ink for the tree. It will not be as bright, though.
Project Supplies:
  • Snow Swirled Stamp Set
  • Riding Hood Red CS
  • Chocolate Chip CS
  • Kiwi Kiss CS
  • Holiday Treasures DSP
  • Encore Gold Ink
  • VersaMark
  • Heat Tool
  • Stampin' Emboss Powder - Gold
  • 1/8" Circle Punch
  • Square Rhinestone Brads - Fire
If you like this idea, you can purchase all of these items on my website at your convenience. Go to http://www.julietupper.stampinup.net/ and look for SHOP NOW in the upper right hand corner! :-)
Stay tuned for more ideas! I will be posting the Stamp-A-Stack ideas VERY SOON!

Thursday, November 13, 2008

Big Shot Tree Card

2 Days until my BIG Christmas Stamp-A-Stack!!! I am so excited!!! I have had one spot open up. Contact me TODAY if you want to come.

I have made up a ton of samples to choose from for the event, but cannot use everything. Here is a card that I am not including in the Stamp-A-Stack. Thought I would share with you :-)


Project Supplies:

Lovely As A Tree Stamp Set
Warm Words Stamp Set
Holiday Treasures DSP
Big Shot Die Cut Machine
Stampin' Up! Exclusive Top Note Bigz Die
Old Olive CS & Marker
Chocolate Chip Marker
Whisper White Craft Ink
Sponge
Ticket Corner Punch
Round Tab Punch

Saturday, November 8, 2008

CRAFT FAIR - Today

Hi Stampers -- Come on over to Calvary Christian School and visit me today at their Holiday Craft Fair. It runs from 9am - 3pm and has 42 different crafters taking part! Come check it out! And make sure to say "hi" to me! If you mention this ad, I will give you a little gift!

Calvary Christian School
Calvary Bible Church
Hampstead Rd
Derry, NH 03038

From the Derry Rotary heading toward Hampsteads Rt 121., the school/church is on the right 1/4 mile after the SECOND blinking light. Approx 3 miles or so from the rotary.

Thursday, November 6, 2008

Header Photo

Totally off the subject of stamping.....

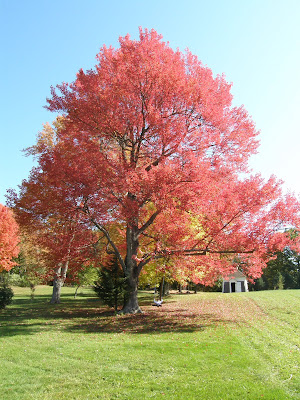
So I have gotten some comments on the photo at the head of my blog, and I wanted to let you all know that my husband took that fabulous photo during the height of leaf peeping season this year. We have been blessed to live near the woods with a little stream out back, a foot bridge and a tree farm up the hill. The farmer lets us walk on his land. It was a gorgeous walk this fall with all the different colors, the tree swings, the pond and various animals we caught off guard. Very peaceful and a great walk for the kids. We do it often, but not often enough!

Here are a few of the other photos taken that day. I just LOVE the reflections in the pond! He did such a wonderful job with these photos! Enjoy and let me know what you think!

Wednesday, November 5, 2008

Watercolor Year By Year Tree Card

10 DAYS UNTIL MY BIG CHRISTMAS STAMP-A-STACK! A few spots are available. Call or email to sign up by November 10th.


This is another example of what we did LAST year. It uses the fabulous Watercolor Crayons and Aquapainter to color the tree. One of my all time FAVORITE techniques! [Tip: Touch the Aquapainter to the tip of the Old Olive crayon to get your color and then blend onto the tree.]
Project Supplies:
  • Year After Year Stamp Set [retired]
  • Old Olive CS
  • River Rock CS
  • Very Vanilla CS
  • Dashing DSP [retired]
  • Basic Brown Ink
  • Watercolor Crayons - Earth Elements
  • Aquapainter
  • 5/8" Very Vanilla Grosgrain Ribbon

Tuesday, November 4, 2008

Purchase YOUR Kit-To-Go Class! Choose from TWO!

Dear Stampers -- Take advantage of these TWO fabulous Kit-To-Go Classes that I am offering! They are absolutely adoreable and would make a great gift and fun project for a friend, loved one or yourself. Use the cards as gift tags for your Christmas gift giving or as thank you cards after the holidays are all said and done. Use the boxes and books as gift items! More details are below pertaining to each individual kit-to-go.

These classes both come with easy to follow directions that will aid you in your crafting. Simply place your order by November 15th! All kits will be ready by the end of the month for pick up. I can send them via the USPS as well for an additional fee [talk to me].

I have attached a photo of both kits. Check them out and place your order by November 15th!

Box of Cards Kit-To-Go!

With this kit, you will receive instructions and materials to make 32 adorable 3"x3" gift cards, complete with envelopes! Even better, they all fit perfectly in their own decorative storage box, also included with your supplies. Keep it for yourself or give it away as a gift!


You'll be making these sweet and versatile cards with "I WISH", one of our newest Simply Scrappin' kits. Find out how easy it is to make dozens of quick and beautiful cards with our all-inclusive, color-matched kits. Perfect for gift giving, or keep for yourself so that you always have a stash of cards to send!·

The cost of the kit is only $25, or purchase two for $45!
Talk to me today to order your kit!
Julie
Book, Boxes and Tags Kit-To-Go Class
With this kit, you will receive instructions and materials to make 4 boxes with tops, 5 note cards, nine gift tags, 3X3 12-page pocket album with 5 tags, and a 3 X 21 accordian album. Keep it for yourself or give it away as a gift!


You'll be making this kit with "I WISH", one of our newest Simply Scrappin' kits. Find out how easy it is to make these fabulous gifting items with our all-inclusive, color-matched kits. Perfect for gift giving, or keep for yourself!
· The cost of the kit is only $35, or purchase two for $60!
Talk to me today to order your kit!
Julie
__________________
Julie Tupper Stampin' Up! Demonstrator
4R Deca Circle Derry, NH 03038 (603) 434-1024
"To love what we do and share what we love, as we help others enjoy creativity and worthwhile accomplishments ... in this we make a difference!" ~Stampin' Up!'s Statement of the Heart
Related Posts with Thumbnails