Come see the NEW catalog!
Play with the NEW "Love You Bunches" Bundle!
Create something fantastic to take home and show off!
What a December! I hope you had a very merry Christmas and a happy New Year!
Let's start the new year off together with a fresh start and a fresh NEW look at some really fun NEW products. Stampin' Up! never ceases to amaze me with the beautiful NEW things that they come up with for us. Come and spend an evening with me browsing the NEW catalog, learning and stamping!
BRING A FRIEND [whom I have not yet met] AND RECIEVE A SPECIAL STAMPED GIFT!
When: Tuesday, January 20th, 7:00 pm
Where: My House, 4R Deca Circle, Derry, NH
Cost: FREE
RSVP to this email or (603) 434-1024 by Friday, January 16th
I look foward to hearing from you soon! See you there!
_________________________________
***Also, please let me know if you are interested in purchasing a copy of the new catalog, $9.95. It will be available January 18th. Reserve your copy and I will have it ready for you when it arrives to me! Let me know if you want me to send you one [there will be a shipping charge]. Current club members can purchase their copy for $5.00 [just another fantastic reason to be a club member!].
_________________________________
***And...now is a fantastic time to have your own workshop! Have a Girl's Night Out to break away from the winter hum-drum. Book yours by Monday, January 5th and receive your choice of 10% off your order at your workshop OR a set of 4 hand-stamped Thank You cards & envelopes from me! See below available dates. If you don't see a date that works then just ask. :-)
Thursday, January 15th
Friday, January 16th
Thursday, January 22nd
Monday, January 26th
Tuesday, January 27th
Thursday, January 29th
I look forward to hearing from you!
Wednesday, December 31, 2008
Tuesday, December 23, 2008
Merry Christmas
Hi Stampers,
I want to wish you all a blessed Christmas! We are celebrating in several different states this year and taking a little hiatis. Enjoy your Christmastide celebrations. I will be back up and running after the new year with some fabulous new products and ideas!
Blessings,
Julie
I want to wish you all a blessed Christmas! We are celebrating in several different states this year and taking a little hiatis. Enjoy your Christmastide celebrations. I will be back up and running after the new year with some fabulous new products and ideas!
Blessings,
Julie
Wednesday, December 17, 2008
Poinsettia Punch Card
Poinsettia plants remind me of my grandmother, Grammy Nash. She was fabulous! And she loved Christmas time and the real reason for the holiday. She was a wonderful lady, and I still miss her. She went to the Lord in 1986, but I still think of her often. Her impact on my life was significant and I look forward to seeing her again in Heaven. Merry Christmas, Grammy!
 Poinsettia Punch Card
Stamp Sets:
Sincere Salutations (#105156, p.140, $20.95)
Inks:
Classic Stampin’ Pad®, Real Red (#103133, p.164, $5.25)
Paper:
I WISH Simply Scrappin’ Kit, Designer Series Paper, (#112193, p.174, $19.95)
Old Olive Card Stock, 4¼”x 11” (#100702, p.164, $5.50)
Real Red Card Stock, scrap(#102482, p.164, $5.50)
Barely Banana Card Stock, Scrap (#102701, p.165, $5.50)
Whisper White Envelope, Medium (#107301, p.167, $6.50)
Accessories:
5 Petal Flower Punch (#109041, p.188, $15.95)
1/8 ” Circle Punch (#101227, p.188, $8.95)
Mini Glue Dots® (#103683, p.191, $4.95)
¼” Grosgrain Ribbon, Real Red (#109052, p.186, $7.95)
Comments: Fold the Old Olive CS in half and adhere the DSP at the bottom of the card using SNAIL. Tie your ribbon. Stamp “Holiday Greetings” in Real Red Ink near the top. Punch two Real Red flowers with the 5-Petal Flower Punch. Crease the petals of one flower, scuff with Real Red Ink, layer flowers and adhere to bottom right of DSP. Punch three 1/8” circles from Barely Banana CS. [Open the paper catcher on the punch to retrieve your dots.] Roll up a Mini Glue Dot for each circle and adhere to flower.
This card is not a traditional poinsettia, but I like it's simplicity. This was one of the Stamp-A-Stack favorites for my attendees. It uses the 5-Petal Flower Punch to make the poinsettia!
Poinsettia Punch Card Stamp Sets:
Sincere Salutations (#105156, p.140, $20.95)
Inks:
Classic Stampin’ Pad®, Real Red (#103133, p.164, $5.25)
Paper:
I WISH Simply Scrappin’ Kit, Designer Series Paper, (#112193, p.174, $19.95)
Old Olive Card Stock, 4¼”x 11” (#100702, p.164, $5.50)
Real Red Card Stock, scrap(#102482, p.164, $5.50)
Barely Banana Card Stock, Scrap (#102701, p.165, $5.50)
Whisper White Envelope, Medium (#107301, p.167, $6.50)
Accessories:
5 Petal Flower Punch (#109041, p.188, $15.95)
1/8 ” Circle Punch (#101227, p.188, $8.95)
Mini Glue Dots® (#103683, p.191, $4.95)
¼” Grosgrain Ribbon, Real Red (#109052, p.186, $7.95)
Comments: Fold the Old Olive CS in half and adhere the DSP at the bottom of the card using SNAIL. Tie your ribbon. Stamp “Holiday Greetings” in Real Red Ink near the top. Punch two Real Red flowers with the 5-Petal Flower Punch. Crease the petals of one flower, scuff with Real Red Ink, layer flowers and adhere to bottom right of DSP. Punch three 1/8” circles from Barely Banana CS. [Open the paper catcher on the punch to retrieve your dots.] Roll up a Mini Glue Dot for each circle and adhere to flower.
Christmas Wreath
Brrrr.....it is cold and snowing outside. Very beautiful! My family, as well as many others in my area, are still without power from last weeks ice storm. We are praying that our pipes hold out and DO NOT freeze. This is day SIX without power. All is well, but I didn't count on losing a full week just before Christmas. Much to do! Much to do! And, it is hard to stamp and scrapbook in the dark. :-(
 At any rate, here is another Stamp-A-Stack creation. I love using non-traditional stamp sets for Christmas card creations. This card uses the Heartfelt Thanks stamp set! LOVE IT! Totally not my idea. But, I saw the idea on http://www.splitcoaststampers.com/ by searching Christmas Wreath. Check it out. You will be blown away at all the variations and ideas.
Christmas Wreath
Stamp Sets:
Holidays & Wishes (#109431, p.146, $17.95)
Heartfelt Thanks (#105429, p.87, $30.95)
Inks:
Craft Stampin’ Pad®, Whisper White (#101731, p.163, $7.50)
Classic Stampin’ Pad®, Always Artichoke (#105219, p.165, $5.25)
Classic Stampin’ Pad®, Mellow Moss (#102774, p.165, $5.25)
Classic Stampin’ Pad®, Riding Hood Red (#111836, p.162, $5.25)
Paper:
Riding Hood Red Card Stock, 4 ¼” x 11” (#111348, p.162, $5.50)
Always Artichoke Card Stock, 4 ¼” x 3 ¾” (#105119, p.165, $5.50)
Chocolate Chip Card Stock, 2 ½” x 1 ¾” (#102128, p.164, $5.50)
Whisper White Card Stock, 3 ½” x 4” (#100730, p.163, $7.50)
Whisper White Envelope, Medium (#107301, p.167, $6.50)
Accessories:
Tafetta Ribbon, Riding Hood Red, 7” (#111365, p.187, $6.95)
Crafter’s Tool Kit, Paper Piercing (#104310, p.191, $39.95)
Mini Glue Dots® (#103683, p.191, $4.95)
Stampin’ Dimensionals (#104430, p.191, $3.95)
Wide Oval Punch (#112082, p.188, $15.95)
Crystal Effects (#101055, p.191, $6.25)
Comments: Fold your Riding Hood Red CS. With Mellow Moss Ink on Whisper White CS, stamp the “solid flower stamp” to create the wreath. Then, stamp the “lined flower” image using Always Artichoke ink and the “dot” using Riding Hood Red Ink. Create your bow and adhere with a Mini Glue Dot. Adhere the stamped layer to the Always Artichoke CS using SNAIL adhesive. Then, adhere that to gift card front. Stamp ”Merry Christmas” using Whisper White Ink on Chocolate Chip CS. Punch out with the Wide Oval Punch. Using the Paper Piercing Tool and Mat, pierce holes in your oval. Adhere with Dimensionals. Gently add Crystal Effects to the “berries” on the wreath. Allow to dry.
Monday, December 15, 2008
December Ice Storm
Ice! Ice! Ice!
Well, we faired through the ice storm with minimal damage. However, we are still without power after almost FIVE days! I am in shock! We have lost all our food in the freezer and refridgerator, and our lives are spread, at the moment, between three different states! Our house is 38 degrees INSIDE!
I am so thankful to the Lord for protecting and providing for my family throughout the past days. He is the only one in control. His glory was all around us with the beauty from the storm. We are in awe with His power. I pray that we can go home soon.
Three birds dared the cold and "rain" to go to "jail" to get some bird food. Thought this was a very cool shot!
Well, we faired through the ice storm with minimal damage. However, we are still without power after almost FIVE days! I am in shock! We have lost all our food in the freezer and refridgerator, and our lives are spread, at the moment, between three different states! Our house is 38 degrees INSIDE!
I am so thankful to the Lord for protecting and providing for my family throughout the past days. He is the only one in control. His glory was all around us with the beauty from the storm. We are in awe with His power. I pray that we can go home soon.
Here are some cool shots that we took on Friday morning.


Three birds dared the cold and "rain" to go to "jail" to get some bird food. Thought this was a very cool shot!
Wednesday, December 10, 2008
Retired Sets + 10% Discount + FREE shipping = FABULOUS SAVINGS!
Hello Stampers!
I am excited to bring you BIG news from Stampin' Up! Read on for two fabulous holiday deals. Discounted sets + FREE shipping!!!
DISCOUNTED SETS!
As you may know, the new Stampin' Up! Idea Book and Catalog will be arriving in January -- I can't wait to see what they have in store! So, to make room for all the great new products they have announced a list of retiring stamp sets. The link is pasted below so that you can check it out and make sure that you've ordered everything on your "must have" list.
RETIRED LIST - Alphabetical
RETIRED LIST - Numerical
However, that's not the big news ... For the first time ever, Stampin' Up! is offering a 10% discount on ALL of their retiring sets! That's right! From today until December 23rd, all retiring stamp sets are 10% off! Note: the retiring stamp sets will be available until January 18, but the discount is only available until December 23.
RETIRED LIST - 10% Discount
And that's not all the news ... FREE SHIPPING!
From now until December 23rd, Stampin' Up! is offering free shipping! On any workshop order, club order, or customer order of $70 or more, you will receive FREE SHIPPING! Add that to the deal they're offering for the discounted stamp sets, and that all adds up to a very merry holiday season!
Contact me today to take advantage of these great deals!
Merry Christmas and Happy Holidays to you and yours!
Merry Christmas,
Julie
__________________
Julie Tupper Stampin' Up! Demonstrator
4R Deca Circle Derry, NH 03038 (603) 434-1024
Email: julietupper@gmail.com
Customer Website: http://julietupper.stampinup.net
Blog: www.juliesstampinroom.blogspot.com
Die-cut Pacific Point Snowflake Card

One of my all time favorite cards! I just love, love, love the simplicity with the snowflakes in the background and the BIG snowflake in the foreground. I used the JUMBO Bold Snowflakes wheel to decorate the background of the card and I die-cut Snowflake #2 with the Big Shot. SOOOOOO SLICK! This is one of the Stamp-A-Stack cards. A big hit!
Project Supplies:
Snow Swirled Stamp Set
Bold Snowflakes Jumbo Wheel
Pacfic Point CS
Brilliant Blue Jumbo Cartridge
Whisper White Craft Ink
1/8" Circle Punch
Rhinestone Brads - Ice
Jumbo Wheel Handle
Big Shot Die Cut Machine
Snowflake #2 Die
Pacific Point Striped Ribbon
Saturday, December 6, 2008
3-D Fish Tank Fun
 For the past week my daughter has been asking, nagging, begging me to make her a fish tank. "Just like the one we saw, Mom. You know the one. Pleeeeeeeeeeeasssssssssssssssssse!" Oh my, how can I resist? My daughter begging to stamp with me!?! Only, I kept stalling. I could not quite figure out how I wanted to go about it to make it just right.
Today, I told her this morning was the time to finally do it. My only problem is that when I am creating on the fly [without a template or picture to copy] I need quiet....no music, no kids, no phone. [That is why I generally do my best work at 11pm!] However, today is a family Saturday...a pajama day....a day that we have not had in a long time, so to shoooo everyone away was not an option. So, "E" stamped and created a variety of items [fish food] for her fish tank, while I created the tank itself. With my husband's music blaring from the stereo and "Mommy, why are you doing that?" "Mommy, what is that for?" "Mommy, can I help?" Sigh..."yes, of course.", it took 2-1/2 hours for us to finalize it, but here is the final creation.
I know it may seem that I am complaining, but I do not intend to do so. I am blessed with my family and I love them so much! I love to stamp with "E", but for some reason this morning I was all stressed about it. Sigh....good memories, right? I hope this creation lasts a long time for her to enjoy. My fabulous husband thought it was "very cool." Phew!

- The window is made with a Large Cello bag, hair gel & glitter. I didn't have an zip-loc bags big enough, so I SNAILed and Sticky Taped it shut REALLY tight to make sure we didn't have a leak in the fish tank. The "water" is layered between the outside Tempting turquoise layer and the inside Whisper White front layer with TONS of Sticky Tape. Great stuff!
- Next time, I think I might add some fish inside with the "water." That way there are some that float around!
- This is a free standing 3-D project, so that "E" can feed the fish!
Project Supplies:
Life's A Breeze Stamp Set
Something Fishy Jumbo Wheel
Brilliant Blue Ink, CS & Jumbo Wheel Cartridge
Tempting Turquoise CS
Whisper White CS
Pink Passion Ink
Only Orange Ink
YoYo Yellow Ink
Garden Green Ink & CS
Stampin' Pastels
Sponge Daubers
Dazzling Diamonds Glitter
Jumbo Wheel Handle
Coluzzle Cutting System
Hobby Blade
Cutting Mat
Large Cello Bag
Sticky Tape
SNAIL Adhesive
Mini Glue Dots
Paper Snips
Hair Gel
Friday, December 5, 2008
Holiday Treasures DSP Card
 Another Christmas idea from my Stamp-A-Stack a few weeks back!
This is an easy one! I just love using the Holiday Treasures DSP to dress up projects....QUICKLY! This card is a snap, if you are looking for something quick to make for your Christmas cards.
Holiday Treasures DSP Card
Holiday Treasures DSP Card
Stamp Sets:
Snow Swirled (#111690, p.32, $24.95)
Lovely As A Tree (#101223, p.106, $25.95)
Inks:
Encore! Pad®, Gold (#101017, p.193, $8.95)
VersaMark Pad (#102283, p.193, $7.50)
Paper:
Close To Cocoa Card Stock, 5 ½” x 8 ½” (#101341, p.164, $5.50)
Chocolate Chip Card Stock, 1 ½” x 5” (#102128, p.164, $5.50)
Old Olive Card Stock, ½” x 5” (#100702, p.163, $5.50)
Holiday Treasures, DSP, 2”x 5”, (#112469, p.170, $9.95)
Very Vanilla Envelope, Medium (#107300, p.167, $6.50)
Accessories:
Brads, Gold (#104337, p.185, $6.95)
1/16” Circle Punch (#101227, p.188, $8.95)
Stamp-A-Ma-Jig
Comments: Fold the Close To Cocoa CS in half. On Chocolate Chip CS stamp “pine bough” in bottom left corner with VersaMark ink. Stamp “Season‘s Greetings” in Encore! Gold just over “pine bough” by using the Stamp-A-Ma-Jig to help you line it up. [Line the glossy side of the imaging sheet UP in the corner of the SAMJ. Ink your stamp and line it up in the corner or the SAMJ. Take your stamped imaging sheet and place it where you want the image on your card. Place the SAMJ in the corner. Carefully remove the imaging sheet and stamp your inked stamp. So slick!]. Adhere DSP to gift card using SNAIL. Adhere Choc. Chip CS [There WILL be a gap between the DSP and the Choc. Chip.] On Old Olive CS mark three holes with pencil and punch using the 1/16“ Circle Punch. Add brads. Adhere Old Olive strip to the card with SNAIL.
Comments: Fold the Close To Cocoa CS in half. On Chocolate Chip CS stamp “pine bough” in bottom left corner with VersaMark ink. Stamp “Season‘s Greetings” in Encore! Gold just over “pine bough” by using the Stamp-A-Ma-Jig to help you line it up. [Line the glossy side of the imaging sheet UP in the corner of the SAMJ. Ink your stamp and line it up in the corner or the SAMJ. Take your stamped imaging sheet and place it where you want the image on your card. Place the SAMJ in the corner. Carefully remove the imaging sheet and stamp your inked stamp. So slick!]. Adhere DSP to gift card using SNAIL. Adhere Choc. Chip CS [There WILL be a gap between the DSP and the Choc. Chip.] On Old Olive CS mark three holes with pencil and punch using the 1/16“ Circle Punch. Add brads. Adhere Old Olive strip to the card with SNAIL.
Tuesday, December 2, 2008
Holiday Crop & Create Class
EVENT #2: Holiday Crop & Create
When: Monday, December 8th, 7 pm
Where: My House, 4R Deca Circle
Cost: $5.00
Please RSVP by Thursday, December 4th
This evening has two options:
1) Come learn and create two wonderful holiday gifting ideas! Learn how to make a gift card holder AND a Box-In-A-Bag Creation. These are two gifts that your friends and family are sure to love!
OR
2) Come use my non-consumable items to help you make your holiday projects! Simply bring your creations & card stock, because I am opening my Stampin' closet for you! Have you wanted to use the Big Shot in your crafting this season, but haven't been able to purchase it yet? Have you all the other punches, except the one that would be PERFECT for your holiday cards, gifting or scrapbooking? Want to heat emboss on your project, but don't own the Heat Tool?
Please sign up with the specifics of what you intend to use, so that I can have it ready for you.
Items for use:
I look forward to hearing from you soon! CLICK HERE to email me.
Happy Stamping,
Julie
When: Monday, December 8th, 7 pm
Where: My House, 4R Deca Circle
Cost: $5.00
Please RSVP by Thursday, December 4th
This evening has two options:
1) Come learn and create two wonderful holiday gifting ideas! Learn how to make a gift card holder AND a Box-In-A-Bag Creation. These are two gifts that your friends and family are sure to love!
OR
2) Come use my non-consumable items to help you make your holiday projects! Simply bring your creations & card stock, because I am opening my Stampin' closet for you! Have you wanted to use the Big Shot in your crafting this season, but haven't been able to purchase it yet? Have you all the other punches, except the one that would be PERFECT for your holiday cards, gifting or scrapbooking? Want to heat emboss on your project, but don't own the Heat Tool?
Please sign up with the specifics of what you intend to use, so that I can have it ready for you.
Items for use:
- Heat Tool & Embossing tools
- Ink Pads & Markers
- Punches, Cropodile, Crimper
- Watercolor Wonder Crayons
- Stampin' Pastels
- Big Shot and various dies [or bring your own die]
I look forward to hearing from you soon! CLICK HERE to email me.
Happy Stamping,
Julie
Monday, December 1, 2008
Chunky Glitter BIG SHOT Snowflakes Card
HAPPY DECEMBER EVERYONE! My family is back from Texas where we enjoyed 70 degree weather and sunny days playing outside on vacation [hence the long time between posts]. Thanksgiving is over and so is November. Christmas is coming, and I am dreaming of a white one!

Chunky Glitter Snowflakes
Stamp Sets:
Punches Three (#111674, p.17, Hostess Level 1)
Inks:
Stampin‘ Write Marker, Night of Navy (#100069, p.165, $3.25)
Watercolor Wonder Crayons, Rich Regals (#106698, p.163, $19.95)
Paper:
Whisper White Card Stock, 5 ½” x 8 ½”, scrap (#100730, p.163, $7.50)
Night of Navy Card Stock, 4 ¼” x 5 ½”, scrap (#100867, p.166, $5.50)
Watercolor Paper, 5” x 3 ¾” (#105019, p.166, $6.95)
Whisper White Envelope, Medium (#107301, p.167, $6.50)
Accessories:
Aquapainter (#103954, p.193, $16.95)
Powder Pal® Trays (#102197, p.190, $19.95)
Stampin’ Glitter, Chunky Essentials (#108797, p.190, $15.95)
2-Way Glue Pen (#100425, p.191, $3.50)
Scalloped Square Punch (#112081, p.188, $15.95)
Mini Glue Dots® (#103683, p.191, $4.95)
Paper Snips (#103579, p.192, $9.95)
Sizzix Die 4-Pack, Snowflakes Set #2 (#113449, p.31 mini, $19.95)
Big Shot Die-Cut Machine (#113439, p.27 mini, $99.95)
Stampin’ Dimensionals (#104430, p.191, $3.95)
Comments: Fold the Whisper White CS gift card. Adhere Night of Navy CS to card front. Using Watercolor Wonder Crayons color streaks across the Watercolor Paper from top to bottom: Night of Navy, Ballet Blue, Brocade Blue, Ballet Blue, Night of Navy. Blend colors with the Aquapainter. Allow to dry. [This paper will curl up when wet, but will dry flat.] Die-cut SIX small snowflakes [2 Night of Navy, 4 Whisper White]. [See directions at BIG SHOT station]. Adhere the Watercolor Paper to the card front. Adhere the white snowflakes with one Mini Glue Dot each. Adhere other snowflakes to top. Ink “A very merry…” by brushing Night of Navy Marker across the image and stamp on provided scrap Whisper White CS. Punch out with the Scalloped Square Punch. Trim with Paper Snips and adhere with Stampin’ Dimensionals. Place card in Powder Pal® tray. Apply 2-Way Glue in swirls to card front and across some of your snowflakes. Cover with glitter, then tap the card stock firmly to remove excess glitter. Pour glitter into jar.
O.K. I admit it...can you tell?.... I am officially ready for SNOW! I love this card because it looks like a wonderfully, beautiful snowy day at home to me. Enjoy the tutorial!
Chunky Glitter Snowflakes
Stamp Sets:
Punches Three (#111674, p.17, Hostess Level 1)
Inks:
Stampin‘ Write Marker, Night of Navy (#100069, p.165, $3.25)
Watercolor Wonder Crayons, Rich Regals (#106698, p.163, $19.95)
Paper:
Whisper White Card Stock, 5 ½” x 8 ½”, scrap (#100730, p.163, $7.50)
Night of Navy Card Stock, 4 ¼” x 5 ½”, scrap (#100867, p.166, $5.50)
Watercolor Paper, 5” x 3 ¾” (#105019, p.166, $6.95)
Whisper White Envelope, Medium (#107301, p.167, $6.50)
Accessories:
Aquapainter (#103954, p.193, $16.95)
Powder Pal® Trays (#102197, p.190, $19.95)
Stampin’ Glitter, Chunky Essentials (#108797, p.190, $15.95)
2-Way Glue Pen (#100425, p.191, $3.50)
Scalloped Square Punch (#112081, p.188, $15.95)
Mini Glue Dots® (#103683, p.191, $4.95)
Paper Snips (#103579, p.192, $9.95)
Sizzix Die 4-Pack, Snowflakes Set #2 (#113449, p.31 mini, $19.95)
Big Shot Die-Cut Machine (#113439, p.27 mini, $99.95)
Stampin’ Dimensionals (#104430, p.191, $3.95)
Comments: Fold the Whisper White CS gift card. Adhere Night of Navy CS to card front. Using Watercolor Wonder Crayons color streaks across the Watercolor Paper from top to bottom: Night of Navy, Ballet Blue, Brocade Blue, Ballet Blue, Night of Navy. Blend colors with the Aquapainter. Allow to dry. [This paper will curl up when wet, but will dry flat.] Die-cut SIX small snowflakes [2 Night of Navy, 4 Whisper White]. [See directions at BIG SHOT station]. Adhere the Watercolor Paper to the card front. Adhere the white snowflakes with one Mini Glue Dot each. Adhere other snowflakes to top. Ink “A very merry…” by brushing Night of Navy Marker across the image and stamp on provided scrap Whisper White CS. Punch out with the Scalloped Square Punch. Trim with Paper Snips and adhere with Stampin’ Dimensionals. Place card in Powder Pal® tray. Apply 2-Way Glue in swirls to card front and across some of your snowflakes. Cover with glitter, then tap the card stock firmly to remove excess glitter. Pour glitter into jar.
Thursday, November 20, 2008
Thanksgiving Thanks
 The holidays are upon us, and it is the time of year that my family likes to celebrate. We are travelling this year to visit my husband's extended family, so we are unable to be with my family for the Thanksgiving holiday. So, I made this card for my mom to let her know that I am thinking of her and miss being with her. I hope she likes it.
I then changed it up a little bit and turned it into a "Thank You" card. I want to give this to my husband's aunt and uncle for hosting us over the holiday.

Project #1 Supplies:
With Gratitude Stamp Set
Holidays & Wishes Stamp SetChocolate Chip CS & Ink
Ruby Red CS & Ink
Very Vanilla CS
VersaMark
Earth Elements Buttons
Mini Glue Dots
Cutter Kit - Distressing Tool
Cutter Kit - Distressing Tool
Heat Tool
Stampin' Emboss Powder - Clear
Powder Pals
Project #2 Supplies:
With Gratitude Stamp Set
Chocolate Chip CS & Ink
Ruby Red CS & Ink
Very Vanilla CS
Sponges
Paper Snips
With Gratitude Stamp Set
Chocolate Chip CS & Ink
Ruby Red CS & Ink
Very Vanilla CS
Sponges
Paper Snips
Mini Glue Dots
Hemp Twine
Hemp Twine
Tuesday, November 18, 2008
Handmade Gifting - Journal & Bookmark

Handmade gifts are the best! What better way to tell someone you care then to make them a journal and write a letter in the first page? That way they always know how you feel. I have two best girl friends. You know the kind that go through everything with you and still like you! The kind that you can call in the middle of the night and cry with. I have two! I am very blessed to know them both. Love you E & J!
One recently had a birthday and I made these items for her. She LOVED them! Pink....is all her color. Not to give it all away or anything, but I bought a "science" journal [you know the one they had you buy for Chemistry in high school?] at the dollar store and then covered it with Designer Series Paper. I adhered Stampin' Up!s fabulous 1-1/4" Striped Rose Red Grosgrain Ribbon to the binding, added some die-cut adhesives from the retired Simply Scrappin' Kit - Rose Cottage, and then stamped a Monogram J [also, retired] and clear embossed it. Voila! Done!

I also made her this super fabulous bookmark! I take NO credit for the idea or design. [Stampin' Up! did this idea at Convention this year. VIEW HERE] But, the colors are all mine :-) Of course, Rose Red to go with the pink theme. I love this bookmark, because it flops over the outside of your book or SU! catalog and the Filigree Brad at the bottom pokes out the end. So pretty!
Here are the details on how to make your own bookmark. Feel free to comment!
Eastern Blooms Bookmark
STAMPIN’ SUPPLIES (items with * are new)
Stamp Sets
*Eastern Blooms (#111624, p.91, $21.95)
Card Stock and Paper
Pumpkin Pie: 4 ¾ x 4 ¾” (#105117, p.164, $5.50)
Whisper White: 2 ¼ x 1 ¾” (#100730, p.163, $7.50)
*Sweet Always DSP: (#112468, p.171, $9.95)
Ink
Regal Rose Classic Stampin’ Pad® (#105211, p.165, $5.25)
Rose Red Classic Stampin’ Pad® (#101778, p.165, $5.25)
Chocolate Chip Stampin‘ Write Marker® (#100071, p.164, $3.25)
Accessories and Tools
On Board Essentials (#112085, p.181, $12.95)
Stampin’ Dimensionals (#104430, p.191, $3.95)
Sticky Tape (#104294, p.191, $6.95)
Micro Beads (#104266, p.190, $5.25)
Filigree Brads (#112577, p.184, $5.95)
Powder Pals (#102197, p.190, $19.95)
Crystal Effects (#101055, p.191, $6.25)
Paper Snips (#103579, p.192, $9.95)
1” Rose Red Double-Stitched Grosgrain Ribbon (#111846, p.186, $8.95)
INSTRUCTIONS
*Pop out the square in the middle of the scalloped On Board Square and set it aside. Ink both sides of the chipboard with Regal Rose Ink. [This can be messy, so you might want to find a wipe first to clean your hands after.] Set aside to dry.
*Layer Sweet Always DSP onto Pumpkin Pie CS.
*Stamp the “flower” image onto Whisper White CS by first inking in Rose Red ink and then coloring the middle with the Chocolate Chip Marker. Cut out with Paper Snips.
*Adhere the layered DSP onto the front of the On Board Scalloped Square with SNAIL. Turn over and adhere four strips of Sticky Tape inside of the open square onto the back of the Pumpkin Pie CS. Adhere ribbon on Sticky Tape inside the square leaving a small space near the top. Apply more Sticky Tape on top of the ribbon and adhere the On Board Square inside, as best you can. Adhere Pumpkin Pie CS with A LOT OF SNAIL on top of the ON BOARD square and ribbon to cover back.
*Fold the bottom of the ribbon in half lengthwise and cut a “V.” Place Filigree Flower and Brad at the bottom.
*Adhere cut flower to the front of your bookmark with a Dimensional on each petal and in the middle. Apply a small amount of Crystal Effects to the middle of the flower only for now. [Be careful this comes out fast!]. Hold your bookmark over the Powder Pals and sprinkle with Micro Beads. [Be careful they bounce!] Apply Crystal Effects to the rest of the flower and over the Micro Beads for a “shellacked” look. Set aside to dry. [This could take a half hour or more depending on the amount of CE you applied.]
Sunday, November 16, 2008
Die-cut "JOY" Card...In Transition


"Why aren't we making that!?!" Is the comment I got when I showed this to the Stamp-A-Stack participants. Umm....."I couldn't simplify it for reproduction or explain it very well?" Sigh....you see I am visual learner and writing the directions for my classes is the toughest job for me. I try so hard to make things easy for everyone and having the directions is a must. BUT....it is a pain! I just could not explain this one [the second card, not the first], because, while very beautiful, the measurements for a regular 4-1/4" x 5-1/2" card just don't quite fit the Pennant Die. So, there is bit of finagling and THAT was the difficult part to explain. I can show you, but that did not fly for the Stamp-A-Stack. That and my brain stopped working after a while what with writing up directions for TEN cards! Oh and the S-A-S cards needed to be easy to replicate and fairly quick, since everyone was making ten DIFFERENT cards. So, I ended up with several versions until I ended up with a simplified EXPLAINABLE version that is a little bit like the first.
Here are the others. You can see my transition to the final version, which is the last "JOY" card with the peek-a-boo snowmen. The third card almost was the one we did, but my dear fabulous husband crinkled his nose at the colors. I told him that it was the one and I liked it, but the next morning my nose crinkled....Sigh....I went back to the drawing board. But, not empty handed. He did like the peek-a-boo snowmen and actually came up with the idea for them to be on the INSIDE of the card! Thanks, Tup!


FINAL VERSION PROJECT SUPPLIES
....[I can post the other ingredients if anyone is interested. Just leave a comment and I will write them up! Thanks! :-)]
JOY Snowman Card
Stamp Sets:
Snow Swirled (#111690, p.32, $24.95)
Holiday Lineup (#111648, p.36, $21.95)
Inks:
Classic Stampin’ Pad®, Kiwi Kiss (#111835, p.162, $5.25)
Classic Stampin’ Pad®, Riding Hood Red (#111836, p.162, $5.25)
Classic Stampin’ Pad®, Baja Breeze (#111833, p.162, $5.25)
Classic Stampin’ Pad®, Close To Cocoa (#103139, p.164, $5.25)
Paper:
Riding Hood Red Card Stock, 3” x 3”, (#111353, p.162, $5.50)
Kraft Card Stock, 4 ¼” x 5 ½”, (#102125, p.166, $7.50)
Very Vanilla Card Stock, 5½”x 11” (#101650, p.163, $7.50)
Very Vanilla Envelope, Medium (#107300, p.167, $6.50)
Accessories:
Wide Oval Punch (#112082, p.188, $15.95)
Sizzix Originals™ Die, Join in the Cheer Decorative Strip Die (#113452, p.29 Mini, $21.95)
Big Shot Die-Cut Machine (#113439, p.27 Mini, $99.95)
Grosgrain Ribbon, 1¼” Riding Hood Red/Very Vanilla (#113099, p.23 Mini, $8.95)
Comments: Fold the Very Vanilla CS in half. Tie a knot in the Red Riding Hood Grosgrain Ribbon and adhere to Kraft CS with SNAIL by tucking the ribbon over the edges and SNAILing to the back of Kraft CS. Adhere Kraft CS to card front. Line up and punch an oval with the Wide Oval Punch [All the way in and ½” from the right hand side. Use two hands…this may be tough]. Open your card and stamp snowflakes around oval: Large - Baja Breeze Ink, medium - Kiwi Kiss Ink, small - Riding Hood Red. Die cut “JOY” with the Big Shot and adhere with SNAIL. [See directions at Big Shot station.] Adhere “JOY” with SNAIL to bottom left of card. Lightly trace the oval “window” with a pencil. Open the card, line up the snowmen over the traced oval, and stamp with Close To Cocoa Ink.
Saturday, November 15, 2008
Another Stamp-A-Stack Creation, not used
The Stamp-A-Stack yesterday was a FABULOUS success! You really should come next year! We had fun and everyone worked very hard to finish all of their wonderful creations. Nicely done, ladies!

Here is another one of the creations that I did not use. I did emboss the tree to get a bolder look for it, but you do not need to if you want to simplify it for mass holiday production. Just use the Encore Gold ink for the tree. It will not be as bright, though.
Project Supplies:
Stay tuned for more ideas! I will be posting the Stamp-A-Stack ideas VERY SOON!
Here is another one of the creations that I did not use. I did emboss the tree to get a bolder look for it, but you do not need to if you want to simplify it for mass holiday production. Just use the Encore Gold ink for the tree. It will not be as bright, though.
Project Supplies:
- Snow Swirled Stamp Set
- Riding Hood Red CS
- Chocolate Chip CS
- Kiwi Kiss CS
- Holiday Treasures DSP
- Encore Gold Ink
- VersaMark
- Heat Tool
- Stampin' Emboss Powder - Gold
- 1/8" Circle Punch
- Square Rhinestone Brads - Fire
Stay tuned for more ideas! I will be posting the Stamp-A-Stack ideas VERY SOON!
Thursday, November 13, 2008
Big Shot Tree Card
2 Days until my BIG Christmas Stamp-A-Stack!!! I am so excited!!! I have had one spot open up. Contact me TODAY if you want to come.
I have made up a ton of samples to choose from for the event, but cannot use everything. Here is a card that I am not including in the Stamp-A-Stack. Thought I would share with you :-)

Project Supplies:
Lovely As A Tree Stamp Set
Warm Words Stamp Set
Holiday Treasures DSP
Big Shot Die Cut Machine
Stampin' Up! Exclusive Top Note Bigz Die
Old Olive CS & Marker
Chocolate Chip Marker
Whisper White Craft Ink
Sponge
Ticket Corner Punch
Round Tab Punch
I have made up a ton of samples to choose from for the event, but cannot use everything. Here is a card that I am not including in the Stamp-A-Stack. Thought I would share with you :-)
Project Supplies:
Lovely As A Tree Stamp Set
Warm Words Stamp Set
Holiday Treasures DSP
Big Shot Die Cut Machine
Stampin' Up! Exclusive Top Note Bigz Die
Old Olive CS & Marker
Chocolate Chip Marker
Whisper White Craft Ink
Sponge
Ticket Corner Punch
Round Tab Punch
Saturday, November 8, 2008
CRAFT FAIR - Today
Hi Stampers -- Come on over to Calvary Christian School and visit me today at their Holiday Craft Fair. It runs from 9am - 3pm and has 42 different crafters taking part! Come check it out! And make sure to say "hi" to me! If you mention this ad, I will give you a little gift!
Calvary Christian School
Calvary Bible Church
Hampstead Rd
Derry, NH 03038
From the Derry Rotary heading toward Hampsteads Rt 121., the school/church is on the right 1/4 mile after the SECOND blinking light. Approx 3 miles or so from the rotary.
Calvary Christian School
Calvary Bible Church
Hampstead Rd
Derry, NH 03038
From the Derry Rotary heading toward Hampsteads Rt 121., the school/church is on the right 1/4 mile after the SECOND blinking light. Approx 3 miles or so from the rotary.
Thursday, November 6, 2008
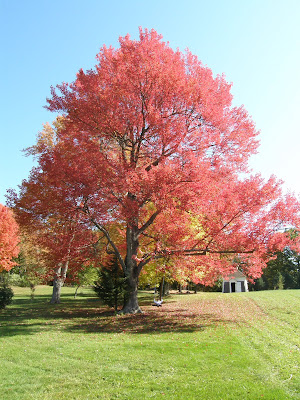
Header Photo
Totally off the subject of stamping.....
So I have gotten some comments on the photo at the head of my blog, and I wanted to let you all know that my husband took that fabulous photo during the height of leaf peeping season this year. We have been blessed to live near the woods with a little stream out back, a foot bridge and a tree farm up the hill. The farmer lets us walk on his land. It was a gorgeous walk this fall with all the different colors, the tree swings, the pond and various animals we caught off guard. Very peaceful and a great walk for the kids. We do it often, but not often enough!
Here are a few of the other photos taken that day. I just LOVE the reflections in the pond! He did such a wonderful job with these photos! Enjoy and let me know what you think!


Wednesday, November 5, 2008
Watercolor Year By Year Tree Card
10 DAYS UNTIL MY BIG CHRISTMAS STAMP-A-STACK! A few spots are available. Call or email to sign up by November 10th.

This is another example of what we did LAST year. It uses the fabulous Watercolor Crayons and Aquapainter to color the tree. One of my all time FAVORITE techniques! [Tip: Touch the Aquapainter to the tip of the Old Olive crayon to get your color and then blend onto the tree.]
Project Supplies:
This is another example of what we did LAST year. It uses the fabulous Watercolor Crayons and Aquapainter to color the tree. One of my all time FAVORITE techniques! [Tip: Touch the Aquapainter to the tip of the Old Olive crayon to get your color and then blend onto the tree.]
Project Supplies:
- Year After Year Stamp Set [retired]
- Old Olive CS
- River Rock CS
- Very Vanilla CS
- Dashing DSP [retired]
- Basic Brown Ink
- Watercolor Crayons - Earth Elements
- Aquapainter
- 5/8" Very Vanilla Grosgrain Ribbon
Tuesday, November 4, 2008
Purchase YOUR Kit-To-Go Class! Choose from TWO!
Dear Stampers -- Take advantage of these TWO fabulous Kit-To-Go Classes that I am offering! They are absolutely adoreable and would make a great gift and fun project for a friend, loved one or yourself. Use the cards as gift tags for your Christmas gift giving or as thank you cards after the holidays are all said and done. Use the boxes and books as gift items! More details are below pertaining to each individual kit-to-go.


These classes both come with easy to follow directions that will aid you in your crafting. Simply place your order by November 15th! All kits will be ready by the end of the month for pick up. I can send them via the USPS as well for an additional fee [talk to me].
I have attached a photo of both kits. Check them out and place your order by November 15th!
Box of Cards Kit-To-Go!
With this kit, you will receive instructions and materials to make 32 adorable 3"x3" gift cards, complete with envelopes! Even better, they all fit perfectly in their own decorative storage box, also included with your supplies. Keep it for yourself or give it away as a gift!
You'll be making these sweet and versatile cards with "I WISH", one of our newest Simply Scrappin' kits. Find out how easy it is to make dozens of quick and beautiful cards with our all-inclusive, color-matched kits. Perfect for gift giving, or keep for yourself so that you always have a stash of cards to send!·
The cost of the kit is only $25, or purchase two for $45!
Talk to me today to order your kit!
Julie
Book, Boxes and Tags Kit-To-Go Class
With this kit, you will receive instructions and materials to make 4 boxes with tops, 5 note cards, nine gift tags, 3X3 12-page pocket album with 5 tags, and a 3 X 21 accordian album. Keep it for yourself or give it away as a gift!
You'll be making this kit with "I WISH", one of our newest Simply Scrappin' kits. Find out how easy it is to make these fabulous gifting items with our all-inclusive, color-matched kits. Perfect for gift giving, or keep for yourself!
· The cost of the kit is only $35, or purchase two for $60!
Talk to me today to order your kit!
Julie
__________________
Julie Tupper Stampin' Up! Demonstrator
4R Deca Circle Derry, NH 03038 (603) 434-1024
"To love what we do and share what we love, as we help others enjoy creativity and worthwhile accomplishments ... in this we make a difference!" ~Stampin' Up!'s Statement of the Heart
Friday, October 31, 2008
Birthday For A Tweenage Girl


 Sunday is my neice's 11th birthday, so I made this special card to go with her gift. I hope she likes it. I am really pleased with the result! I used paper piercing to accent the Wide Oval and a little Crystal Effects to make the balloons POP! On the inside of the card [not pictured], I used several alphabet and number sets to write a sentiment for her.
Photo one: Full card is one sheet of 8-1/2 x 11" sheet of cardstock
Photo two: Detail of the bottom of the card
Photo three: Detail of the decoration
Let me know what you think. I would love your feedback. Thanks!
Project Supplies:
Bitty Birthday Stamp Set
Just B Stamp Set
Contempo Alphabet Stamp Set [inside, not pictured]
Big Deal Numbers Stamp Set [inside, not pictured]
Short Order Alphabet Stamp Set [inside, not pictured]
Sweet Always Designer Series Paper
Regal Rose CS, Ink & Marker
Rose Red CS, Ink & Marker
Pumpkin Pie CS & Marker
Blush Blossom CS & Marker
Chocolate Chip Ink
Basic Brown Ink
Wide Oval Punch
Crafter's Tool Kit
Rose Red 1" Double-Stitched Grosgrain Ribbon
Crystal Effects
Dimensionals
Big Shot FRANKIE Z-Fold Card
 Hi All! We are not much in to Halloween around my house, but I COULD NOT RESIST "Frankie". Isn't he soooo stinkin' cute!?!
I make absolutely no claim to this idea. If you look on http://www.splitcoaststamper.com/ and search Frankie, you will find a whole bunch of versions. I combined many of those and made slight variations to make mine. We did this card at my recent Stamp Camp and everyone LOVED it!!!
INSTRUCTIONS:
- Fold the Pumpkin Pie card stock in half, using the bone folder to get a sharp crease. Then, fold back one side to make the “z-fold card.” Adhere Basic Black card stock on either side of the center fold.
- Stamp “Happy Halloween” on the bottom of the z-fold side with Whisper White Craft Ink. Let dry.
- Punching out your pieces… A) Use the Big Shot Machine and the Top Note Die to die-cut one and a half Top Notes: Lovely Lilac 2.5x5” and Green Galore 4x5“. B) Punch TWO 1 ¼” Whisper White circles. C) Punch TWO 1” Basic Black circles. D) Punch ONE 1-3/8” Green Galore Circle. E) Punch ONE Green Galore Large Oval.
- Putting “Frankie” together: A) Cut his hair using the Paper Snips. With Lovely Lilac Ink, stamp “dots” all over hair. Adhere, leaving the bangs without any SNAIL on them. B) Eyes…Adhere Basic Black circles to Whisper White and using the Singo White Gel Pen add two lines to eyes. Cut Green Galore circle in half, ink with Green Galore ink pad and adhere as eyelids. Adhere entire eye underneath bangs. C) Nose…Cut the Green Galore large oval in half and then a bit on the sides. Adhere askew. D) Add stitches with journaling tip of Basic Black Stampin’ Write Marker.
- Adhere Frankie to the top of card. Make sure the z-fold is under his face, not his hair to allow the card to open and shut.
All Holidays (#109397, p.142, $31.95)
Itty Bitty Backgrounds (#109507, p. 122, $12.95)
Pumpkin Pie: 11 x 4 ¼” (#105117, p.164, $5.50)
Green Galore: 4 x 5 ” & scrap (#101768, p.164, $5.50)
Lovely Lilac: 4 x 5” (#100427, p.164, $5.50)
Basic Black:2 - 2 ½ x 4” & scrap (#102851, p.163, $7.50)
Whisper White: scrap (#100730, p.163, $7.50)
Lovely Lilac Classic Stampin’ Pad® (#102874, p.164, $5.25)
Green Galore Classic Stampin’ Pad (#102122, p.164, $5.25)
Whisper White Craft Ink (#101731, p.163, $7.50)
Basic Black Stampin’ Write Marker (#100082, p.163, $3.25)
Uni-ball Singo White Gel Pen (#105021, p.193, $3.95)
*Big Shot Machine (# 113439, Mini p. 27, $99.95)
*Stampin’ Up!‘s Top Note Bigz Die (# 113463, Mini p. 28, $21.95)
1” Circle Punch (# 109046, p. 188, $10.95)
1 ¼” Circle Punch (# 104403, p. 188, $15.95)
1-3/8” Circle Punch (# 104401, p. 188, $15.95)
Large Oval Punch (# 107305, p. 188, $15.95)
SNAIL Adhesive® (#104332, p.191, $6.95)
Paper Snips (#103579, p.192, $9.95)
Bone Folder (#102300, p.192, $6.95)
Thursday, October 30, 2008
Another Christmas Idea
 Getting so excited!! There are just sixteen days until the BIG Christmas Stamp-A-Stack [click for detailed information]. I am sooooo looking forward to it! I still have a few spots available for it on November 15th from 1-4pm at my house. CONTACT ME to register by November 10th.
Here is yet another installment from LAST years BIG Christmas Stamp-A-Stack! So quick and easy! Enjoy!
Project Supplies:
Season of Joy Stamp Set
Wild Wasabi CS & Ink [retired]
Real Red CS & Ink
Silver Brads
Crafter's Tool Kit
Red Gingham Ribbon
SNAIL Adhesive
Wednesday, October 29, 2008
BIG Deal on the Big Shot!! Plus, NEW Big Shot Club and exclusive Big Shot Class!

Dear Stampers -- I am right in love with my Big Shot, and I KNOW you will be to when you get your hands on one! And, boy do I have a deal for you! If you place an order for the Big Shot Starter Kit with Bag [click on it to see contents of kit] by October 31st, 8pm, you will recieve all of the following FREE with your Starter Kit.
- Level 1 Hostess Set$25 from the current Catalog or Mini Catalog
- Choose a die from the Mini Catalog from me! [up to $15.95!]
- A Fall & Winter Catalog [If you have one, I will put you on my list for the next new one!]
- Plus, a FREE class on learning how to use your BIG SHOT when it comes in. [All projects will utilize your kit!]
WOW!! That is a total of $85 in FREE merchandise and class fees with your purchase of the BIG SHOT Starter Kit with Bag !!!! Can't beat that deal!
You can place your order in one of two ways:
1) Order and pay for the BIG SHOT Starter Kit with Bag outright by Friday, October 31st, 8pm. You can call, 603-434-1024 or email me. [Please have your choice of hostess set, $25 merchandise, and free die all ready to go when you call. Thanks!]
2) Join the Big Shot Club and spread out your investment over four months. Call or email me for a contract.
BIG SHOT CLUB
WHAT'S IT ALL ABOUT? Do you want to own the amazing BIG SHOT with all of the great dies and accessories, and the convenient and beautiful custom "doctor's bag?" Do you want them all, but just can't buy everything at the same time? The BIG SHOT Club is for you! The BIG SHOT Club is a way to have it all by spreading out your investment over four months. Best of all, you will also receive hostess benefits for the equivalent of a $250 workshop!
HOW DOES IT WORK? By joining the BIG SHOT Club, you agree to pay $71.50 (including shipping and handling) each month, over a period of four months. At the beginning of the four-month period, you may also pick a Hostess Set from Level 1 plus $25 worth of merchandise from the catalog. (You can even choose to use your hostess benefits to acquire additional dies for your BIG SHOT!) At the end of the four-month period, you will receive these hostess gifts plus the BIG SHOT Special Edition Starter Kit with Bag. If you have not previously received a catalog, you will receive one free when you join the club.
WHEN DO I START? Right away! The due dates for the monthly payments are the first day of each month. You may pay by check or by credit card, but I must receive payment by the first or I will charge the card you have on file.
HOW DO I GET MY ORDER? Orders may be picked up from me or may be mailed to a location most convenient for you. (Tax for addresses outside of NH will be additional, and will be applied where applicable.)
For more information, or if you are interested in joining the BIG SHOT Club, contact:
Julie Tupper
Independent Stampin' Up! Demonstrator
(603) 434-1024
Tuesday, October 28, 2008
HOLIDAY IDEAS with Shelli!
Hi Stampers! If you have never had the pleasure of seeing Shelli Gardner [Stampin' Up! CEO] you are in for a treat!
[Interruption: The UPS guy is here! Yippee!!!!......I'm like the cats with hearing our van drive up the road. I can hear the UPS truck coming from a long way off and am in the window waiting for him to pull up! :-) ]
But I digress....Anyway, Shelli is fabulous! I saw her in person at Regionals last year. The woman has so much energy and enthusiasm. She was invited to do a spot for Studio 5 at KLS, a TV station in her area [Utah], for holiday themed decorations. Check out how the Co-Founder of Stampin' Up! is using her Big Shot!
CLICK HERE
Let me know if you see anything you like and want me to show you. :-) I would love to help teach you more Stampin' Techniques! Contact me here.
Thursday, October 23, 2008
Fall Leaf Thank You Card - Stamped Collage Technique

I don't mean to skip right over fall cards! Here is one that I we just did at my New Catalog Stamp Camp last weekend and will do tomorrow at Round Two up north. It uses the Stamped Collage Technique
- Fold your Ruby Red gift card and crease with Bone Folder.
- Stamp leaves randomly over the Very Vanilla CS [Please keep leaves in their appointed colors: Maple Leaf – More Mustard, Birch Leaf – Ruby Red, Ash Leaf – Pumpkin Pie]
- Sponge Pumpkin Pie Ink into the bare spots on the Very Vanilla CS.
- Stamp “Thank You” with Chocolate Chip Ink in lower right hand corner.
- Adhere Very Vanilla CS to Chocolate Chip CS with SNAIL.
- Measure and cut three pieces of Riding Hood Red Taffeta Ribbon: 6 ½”, 4 ½” and 1” using the Craft & Paper Scissors. Adhere 6 ½” piece of ribbon with SNAIL across card front and tuck the ends underneath. Adhere card front to the Ruby Red gift card.
- To make the bow: Apply ½” SNAIL to the center of 4 ½” piece of ribbon and fold the ends to the center. Apply SNAIL to the 1” piece of ribbon and wrap around the center of the 4 ½” piece. Adhere your bow to the card front with a Mini Glue Dot.
109300 With Gratitude $22.95 p109
111714 Wow Flowers $12.95 p138
102259 Ruby Red Classic Ink Pad $5.25 p164
103162 More Mustard Classic Ink Pad $5.25 p164
105216 Pumpkin Pie Classic Ink Pad $5.25 p164
100908 Chocolate Chip Classic Ink Pad $5.25 p164
102030 Ruby Red 8-½” x 11” Cardstock $5.50 p164
102128 Chocolate Chip 8-½” x 11” Cardstock $5.50 p164
101650 Very Vanilla 8-½” x 11” Cardstock $7.50 p163
103683 Mini Glue Dots $4.95 p191
104332 SNAIL Adhesive $6.95 p191
108360 Craft & Paper Scissors $29.95 p192
101610 Sponges $3.50 p193
111365 Riding Hood Red Taffeta Ribbon $6.95 p187
104152 Paper Cutter $24.95 p192
102642 Stampin’ Scrub $14.95 p192
102394 Stampin’ Mist $3.95 p192
102300 Bone Folder $6.95 p192
Faux Postage 2007 Stamp-A-Stack Card

Giving you another sample from last year's Big Christmas Stamp-A-Stack!
Click here to print off the Faux Postage onto your Very Vanilla CS and then trim with the Fiskar's Postage Scissors to create this unique look.
Project Supplies:
It's Snow Time Stamp Set[retired]
Supersized Snowflake [retired
Very Vanilla CS
Ruby Red CS, Ink & Marker
Old Olive CS, ink & Marker
Basic Black Ink
Fiskar's Postage Scissors [not SU!]
The BIG Christmas Stamp-A-Stack!
Come Stamp-a-Stack!
It is that time of year again, and I know that many of you have already asked the BIG QUESTION … "What am I going to do for my Christmas cards this year???" … Followed quickly by the lament, "I haven't had time to even think of a stamping idea, let alone buy the ingredients!" Never fear! I have heard your laments and I have the answer for you:
THE BIG CHRISTMAS STAMP-A-STACK!
At the Stamp-a-Stack you will make ten beautiful, simple, easy-to-duplicate cards, each with a different design – all the ingredients will be pre-cut for you, the cards designed and displayed for you to copy, and even the envelopes are included – so by the end of the event, you'll have ten different cards that are ready to send and ten great ideas to use to make the rest of your Christmas cards! (Even if you already have an idea for this year's Christmas cards, come have a fun day out and play with all the latest Stampin' Up! products. :-)
This is a great event to invite a friend to! Make it a Girls' Day Out!
The cost for the Stamp-a-Stack is only $20, and the entire amount will be refunded with your purchase of $75 or more! (This is not a Stamp Camp, so the registration fee applies for Stamper's Club members as well.) Your purchase will also earn you raffle tickets for the Mystery Hostess Raffle, which is potentially over $100 in free stampin' products!
Here are the details:
When: Saturday, November 15th
1:00 p.m. – 4:00 p.m.
Where: My House, 4R Deca Circle, Derry, N.H.
R.S.V.P HERE....As soon as you can :-)
NOTE: Spots fill up quickly, so sign up right away! Adults only, please (Or teens 13 and above). Your spot will be reserved upon receipt of your registration fee. (Your fee must be paid when you register, no exceptions.) Class fees are non-refundable, but registrations may be transferred if you find someone else to attend in your place. You're going to love the Stamp-a-Stack, so register today to make sure that you don't miss out on this fun event! I can't wait to hear from you!
Samples from last years Big Christmas Stamp-A-Stack

This year's BIG CHRISTMAS STAMP-A-STACK is just around the corner on Saturday, November 15th! Email me if you want to register. The cost for ten different ideas is $20!
This is one of the cards we made last year! If you like this style and want to use a different tree, for instance from the current "Snow Swirled" or "Lovely As A Tree" stamp sets, we used the stamp off technique to get the two shades of trees. Simply stamp your tree twice before re-inking!
Product Supplies:
Solumn Stillness Stamp Set [retired]
Brocade Blue CS
Night of Navy Ink
Silver Encore Ink
Whisper White Ink
Whisper White Taffeta Ribbon
Silver Cord
Thursday, October 9, 2008
Brilliant Blue Snowmen Christmas Card
 Brilliant Blue Snowmen Christmas Card
 You will need the following CS: 8-1/2"x 4-1/4" Brilliant Blue CS, 8-1/2"x 4-1/4" Whisper White CS, 3-1/2"x4-1/2" Vellum Paper, 4-1/4"x5-1/2" Bashful Blue CS, Scrap piece of Whisper White and Bashful Blue.
1) Fold your Whisper White and Brilliant Blue gift cards and crease each with Bone Folder.
2) Cut a window in the Brilliant Blue CS by using your Paper Cutter and cutting 3/4" from the edge of all sides. Repeat with 4-1/4"x5-1/2" Bashful Blue CS.
3) Stamp "Small Snowflake" in Brilliant Blue Ink randomly over card front.
3) Ink “Snowmen” with VersaMark and stamp onto 3-1/2"x 4-1/2” piece of Vellum Paper. Sprinkle with Black Stampin' Emboss Powder and heat with Heat Tool. [Tip: Be careful not to burn the paper or yourself!]. Then, color the snowmen with Brilliant Blue, Bashful Blue and Only Orange Stampin’ Write Markers. Allow to dry.
4) Adhere Vellum to the back of Brilliant Blue CS window with SNAIL and then adhere Bashful Blue CS over the Vellum to cover the back/inside front cover.
5) Punch three flowers from scrap Bashful Blue CS with the 5-Petal Flower Punch. Adhere together with SNAIL. Stamp “a very merry Christmas to you” in Black StazOn Ink onto scrap Whisper White CS. Punch out with 1- 3/8” Circle Punch. Stamp “small snowflake” twice on the 1-3/8” circle. Adhere the 1-3/8” circle to the “flower snowflake” and, then to the bottom right near the snowmen.
6) Adhere gift cards together to make a trifold card. Trim as needed, so that the card closes properly.

 7) Stamp “small snowflake” in Brilliant Blue Ink and “Medium Snowflake” in Bashful Blue Ink randomly on the inside of your card.
8) Stamp “May the True Spirit…” saying stamp to inside with Brilliant Blue Ink.
Project Supplies:
111648 Holiday Lineup $21.95 p36
111690 Snow Swirled $24.95 p32
111604 Best Yet Hostess p18
100691 Brilliant Blue Classic Ink Pad $5.25 p164
105209 Bashful Blue Classic Ink Pad $5.25 p165
111837 Black StazOn Ink Pad $5.25 p162
100057 Brilliant Blue Stampin’ Write Marker $3.25 p164
105111 Bashful Blue Stampin’ Write Marker $3.25 p165
100051 Only Orange Stampin’ Write Marker $3.25 p164
100721 Brilliant Blue 8-½” x 11” Cardstock $5.50 p164
105120 Bashful Blue 8-½” x 11” Cardstock $5.50 p165
100730 Whisper White 8-½” x 11” Cardstock $7.50 p163
104332 SNAIL Adhesive $6.95 p191
109041 5-Petal Flower Punch $15.95 p188
104401 1-3/8” Circle Punch $15.95 p188
104152 Paper Cutter $24.95 p192
102642 Stampin’ Scrub $14.95 p192
102394 Stampin’ Mist $3.95 p192
102300 Bone Folder $6.95 p192
Heat Tool, Black Stampin' Emboss Powder, Powder Pals
Tuesday, October 7, 2008
Promotions, Announcements and LIMITED TIME SPECIALS
Hi Stampers!
I am sorry I haven't posted in a while. I have been soooooooo busy! It is crazy. I get to the end of my days and wonder, "where did the time go?" I do have some fabulous ideas to post, so check back frequently. I am going to TRY to get those on here for you soon.
This month so many exciting things are going on. Please make sure to read this and check my website for up to date promotions and Limited-Time Specials. You won't want to miss these great deals!
***Stampin' Up is celebrating World Card Making Day by offering a fantastic 20% off of the Card Elements and Card Kits! These items have been so popular and now is the time to stock up. This promotion ONLY goes through October 11th! Place your order TODAY by calling or emailing me OR go to my web-site and click on SHOP NOW in the upper right hand corner! I am offering a free set of hand made cards from me as a "thank you" for your order between now and Oct.11th!
***Everybody has a birthday, including Stampin'Up! Celebrate with us for our 20th Birthday Bash by taking advantage of the select birthday sets on sale right now. Check out the flyer at HERE
Item # Page # Description Retail Price 20% Off Price
109439 62 Big Bold Birthday $27.95 $22.36
112895 62 Cumpleaños genial y divertido (Spanish Big Bold Birthday)* $27.95 $22.36
111532 63 Party Hearty* $26.95 $21.56
110994 64 Bitty Birthday $12.95 $10.36
111618 64 Crazy for Cupcakes* $23.95 $19.16
111546 65 Simple Birthday Thanks* $17.95 $14.36
111702 65 Time to Party* $16.95 $13.56
108559 68 Crab & Company $27.95 $22.36
***Thinking of becoming a Stampin' Up Demonstrator? It is a FABULOUS way to do what you love, while earning free Stampin' items and sharing your love of stamping with others. I would love to have you as part of my team and if you sign to become a demonstrator in the month of October, I will help you get started with a FREE stamp set [value up to $29.95] from the current catalog! Also, see if the $99 Starter Kit Promotion is for you by checking out the flyer HERE . Talk to me today to find out all about this great opportunity!
***Spots are still available for my STAMP CAMP on Saturday, October 18th form 1-4 pm at my house. Please contact me to sign up and register.
***Come say "hi" to me at Calvary Christian Schools Holiday Craft Fair Fundraiser! It is on Saturday, November 8th from 9am-3pm at Calvary Bible Church in Derry, NH. I will be demonstrating fabulous ideas, have fantastic specials for the day and a gift basket give away!
***KEEP THE DATE for my BIG CHRISTMAS STAMP-A-STACK on Saturday, November 15th at my house in Derry. More details to come!
I hope you all are having a great fall season! I look forward to hearing from you soon!
Happy Stampin,
Julie
Wednesday, September 24, 2008
Big Shot Scalloped Envelope Cards


These cute little 3"x 2" cards fit perfectly into the Scalloped Envelope cut with the exclusive Bigz Scalloped Envelope Die by Stampin' Up! I used the Maine Blueberry Designer Series Paper [DSP] for the envelope and strips on the gift cards. The Big Shot combined with some punches, the Curly and Cute Stamp Set and the Lovely Labels Stamp Set makes it so fast and easy to make them! A great little gift or a quick and easy way to adorn a gift!
Project Supplies:
Curly and Cute Stamp Set
Lovely Labels Stamp Set
Old Olive CS
Not Quite Navy CS
Whisper White CS
White StazOn Ink
Old Olive Ink
Not Quite Navy Ink
Maine Blueberry DSP
1-3/8" Circle Punch
1-3/8" Square Punch
Curly Label Punch
Corner Rounder Punch
Big Shot Machine
Bigz Scalloped Envelope Die
Saturday, September 20, 2008
Scalloped Envelope Big Shot Box

I LOVE, LOVE, LOVE the new BIG SHOT MACHINE! Especially, Stampin' Ups! exclusive dies. This project uses the brand new Scalloped Envelope Bigz Die and is the template for the lovely scalloped top. Just die-cut four of them in the color of your choosing, fold on the score lines and adhere together using Sticky Tape! [I found the idea for this CUTE little box on http://www.spiltcoaststampers.com/ and adapted it to my tastes. What do you think? The idea came from Whoopsie Daisy and also Tara Kieninger. Check out their creations by clicking each name.]

I just LOVE that site and use tons of ideas from there. Now you know one of my secrets...shhh...don't tell ;-).....

I changed the top a bit by making a Scalloped Tab to close it. How? The DSP comes with a 12 x 12 card board backing. I SNAILed my DSP to that and then punched it out with the Scalloped Circle Punch! Then, I used my Paper Snips to cut a slit just to the center of each scallop. Wrapping the Pretty In Pink Taffeta Ribbon around the bottom of the box, I then attached the ribbon to the underside of each scallop. Adhere your bow slightly above the slit and then put your scallops together to have the appearance of one scallop ! Done!
Project Supplies:
Think Happy Thoughts Stamp Set
Bella Rose Designer Series Paper [DSP]
Basic Gray CS & Ink
Whisper White CS
Pink Pirouette Ink
Rhinestone Brads - Fire
Pretty In Pink Taffeta Ribbon
1/16" Circle Punch
1-3/8" Circle Punch
Scalloped Circle Punch
SNAIL
Sticky Tape
Big Shot Machine
Scalloped Envelope Bigz Die
Tuesday, September 16, 2008
Be A Demonstrator
Stampin’ Up!® needs all kinds of demonstrators!
Which demonstrator would you be?
· Discount Demonstrator: Likes the idea of buying stamps for personal use at a 20% discount and occasionally sells to neighbors, relatives, friends, etc.
· Short-term Demonstrator: Sells for short period of time to earn a specified amount of money and stops when the goal is reached.
· Seasonal Demonstrator: Works hard at the business during September, October and November for seasonal money and maintains minimum orders and sales during the balance of the year.
· Hobby Demonstrator: Loves doing workshops and earning extra money when it is convenient; works a lot some months and very little other months; likes to do workshops that are easy to book; doesn’t like to work to hard to book workshops.
· Career Demonstrator: Views being a Stampin’ Up® demonstrator as having a viable business with long-term career potential; pursues management and wants to move up the career ladder; loves attending Stampin’ Up!® events and has developed close social relationships with other demonstrators; works at her business in a consistent and outgoing manner.
As you see, this is a flexible, fun business you can build to suit your needs and desires. Make it fit for you by using your unique talents and style! Join my team!
If any of these ideas appeal to you, ask me for more information about becoming a demonstrator!
Julie Tupper
Julietupper@gmail.com
(603) 434-1024
How to Save Over 20% on Stampin' Up! Products
How to Save Over 20% on Stampin' Up! Products
Do you LOVE to stamp, scrapbook or decorate your home?

BONUS: Join my team and you will receive a set of sample cards from me. Choose up to three different stamp sets from my current inventory ... I will then custom design a set of cards just for you.
Do you LOVE to stamp, scrapbook or decorate your home?
Are you sitting at your computer right now nodding your head?!
If so, right now is the perfect time to join my team and become a Stampin' Up! Demonstrator. For a limited time, there are several ways to join my team.
Check out these options:
$99.00 Mini Starter Kit - 3 choices
$199.00 Standard Starter Kit - includes a FREE stamp set
BONUS: Join my team and you will receive a set of sample cards from me. Choose up to three different stamp sets from my current inventory ... I will then custom design a set of cards just for you.
If you stamp, scrap or decorate for a hobby - why not save money while doing so? The benefits of being a Demonstrator go on and on. Read about the benefits on my "Be a Demonstrator" page.
Want to sign up today? Instantly? Visit My Stampin' Up! Website and click "Join Now" in the upper right hand corner.
Have questions? Contact Me I am more than happy to answer any questions you may have. If I don't know the answer, I will track down the answer for you.
Let the fun begin! I can't wait to have you join my team and share the love of Stampin' Up! I'll be standing by my E-Mail waiting to welcome you aboard.
Free Standing Pop Up Card

This card LOOKS complicated, but it really is not. I take absolutely no credit for this idea or even the design as I cased it from Mary Jo. She is one of the fabulous stampers who does tutorials for SplitCoastStampers.com. She has given some fabulous instructions on how to make this "Free Standing Pop Up Card." Check it out here.
What I love best about this card is the way it folds down and fits nicely in a Medium sized envelope. What a treat to have this come in the mail! I sent mine to a friend who makes others smile. :-) She is an inspiration!
Project Supplies:
Eastern Blooms Stamp Set
A Beautiful Thing Stamp Set
Canvas Background Stamp
Old Olive CS & Ink & Marker
Pink Passion CS & Ink & Marker
Summer Sun CS & Ink & Marker
Whisper White CS
Pumpkin Pie Ink & Marker
Basic Black Marker
Jumbo Eyelets
Metallic Eyelets
Cropodile
Earth Elements Brads
1 1/4" Circle Punch
1 3/8" Circle Punch
Trio Flower Punch
Corner Rounder Punch
Pumpkin Pie Striped Ribbon
Linen Thread
Mini Glue Dots
Pop Glue Dots
Hobby Blade
Paper Cutter
Subscribe to:
Posts (Atom)


